Layout
Tilesets, also called Chipsets, are the basic building block of any map. Think of them as like lego bricks you can use to build your map. In RPG Maker 2000 and 2003, each tile is 16 x 16 pixels. You can only use one tileset at a time for one map ID. Further in this guide the process of importing tilesets will be explained. Tilesets follow this specific layout.
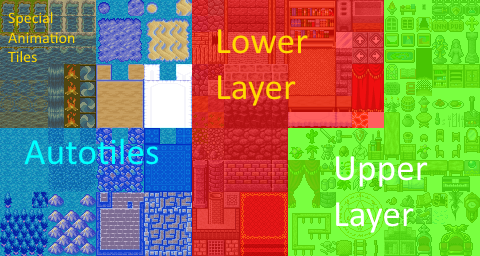
- Lower layer Used for things such as floors and walls. These are in the background of the map, but above the background panorama. Can have terrain assigned to them to play footstep sounds.
- Upper layer: Used for things than go on top of the lower layer tiles. Think like furniture, trees, and small props. Can make an event and select event graphic to put them on top of other upper layer tiles.
- Autotiles: Smart tiling method to automatically make tiles change their tiling based on their placement. Can also be used as normal lower layer tiles with a certain technique.
- Special animation tiles: Includes animated tiles and water tiles.
Autotiles
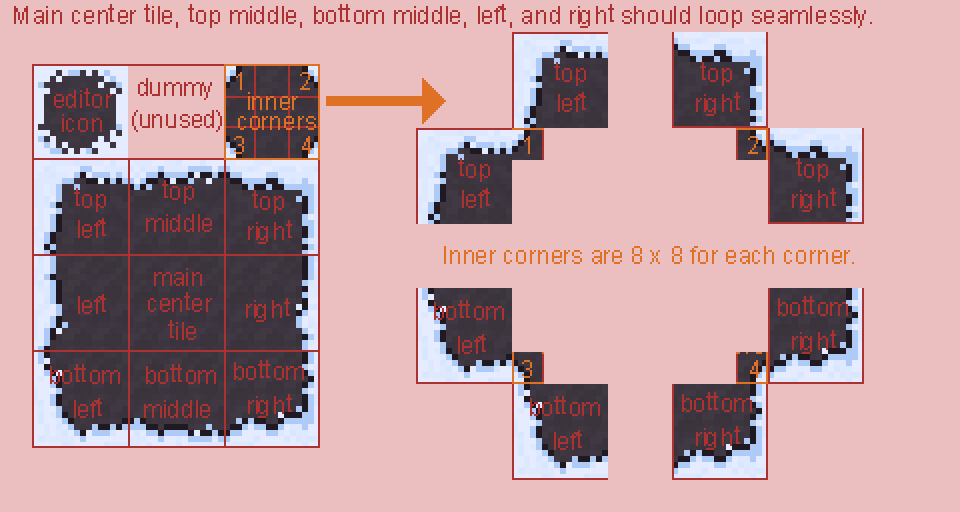
Autotiles consist of a 3 x 3 tiles area, an inner corner tile where each corner is 8 x 8 pixels, an editor icon that is used to select your autotile in the map editor, and a dummy tile that serves no purpose.
Autotiles function as lower layer tiles in their behavoir, i.e. they can have upper layer tiles on top of them. Due to the fact that they take up a large portion of the tileset, there is a space conservation method that can be used to use them like how you would use normal lower layer tiles.
How to use autotiles as normal lower layer tiles?
- Place your wanted tiles on the 3x3 autotile area and on the inner corner tile.
- Set the terrain, passability, and passage of the autotile in database after importing the tileset using resource manager. Note that a limitation of this method is that all tiles in the autotile can have only one type of passability and terrain ID.
- Select your autotile in the map editor, and using pen tool, put down a 3 x 3 area of tiles on your map. It must be 3x3 for this to work. Make a plus sign (+) pattern for the inner corner tile to show up.
- Using the selection tool that looks like a dotted rectangle with a cursor on it, select the part of the autotile you placed down that you want to use. You can now drag the tile or copy it to its desired location without the autotiling affecting it.
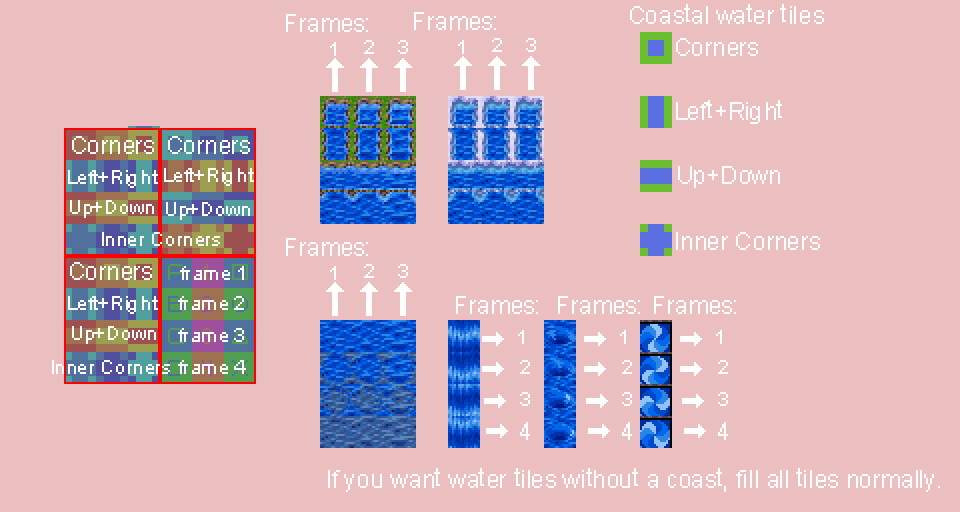
Special Animation Tiles
There are 2 types of animated tiles, water tiles and normal animated tiles. Water tiles have 3 frames, and can have an autotile-like coast if you desire. The coast will draw a border around your normal lower layer tiles. Normal animated tiles have 4 frames. Keep in mind that water tiles and animated tiles appear in the editor as only the first still frame, but in the game, they will be animated.
Importing Tilesets
Preparing the tileset for importing
- In your graphics editor, add a new layer below your tileset graphics layer. Make this layer a solid color. Make sure the color is unused on your tileset.
- Export your tileset as a .png image. Other image file formats like .bmp and .xyz can work, but they are not recommended.
- Index your tileset's color palette to an 8-bit palette / 256 colors. If you are not sure how to do that, search online for "Index color palette 8-bit (your graphics editor here)".
- Save as a .png, now your tileset is ready for importing into RPG Maker 2000 / 2003.
Importing the tileset
- In your RPG Maker project, in the top bar, go to Tools then choose Resource Manager.
- Select the Chipsets folder, and click Import.
- Select your tileset image file.
- Click on the transparent color anywhere in your tileset. The transparent color is the solid color you filled your tileset with earlier. It is not actually transparent in the editor, but in the game it will be. If you do it right, the transparent color should start flashing.
- Click OK.
- If you get any errors, make sure your tileset follows the tileset template, is 480 x 256 pixels in size, has a transparent color picked, uses the png file format, and is indexed to 8 bit (has only 256 colors).
Your tileset is still not ready to use in your map, as it needs to have terrain and passabilty assigned to it. This is done in the database.
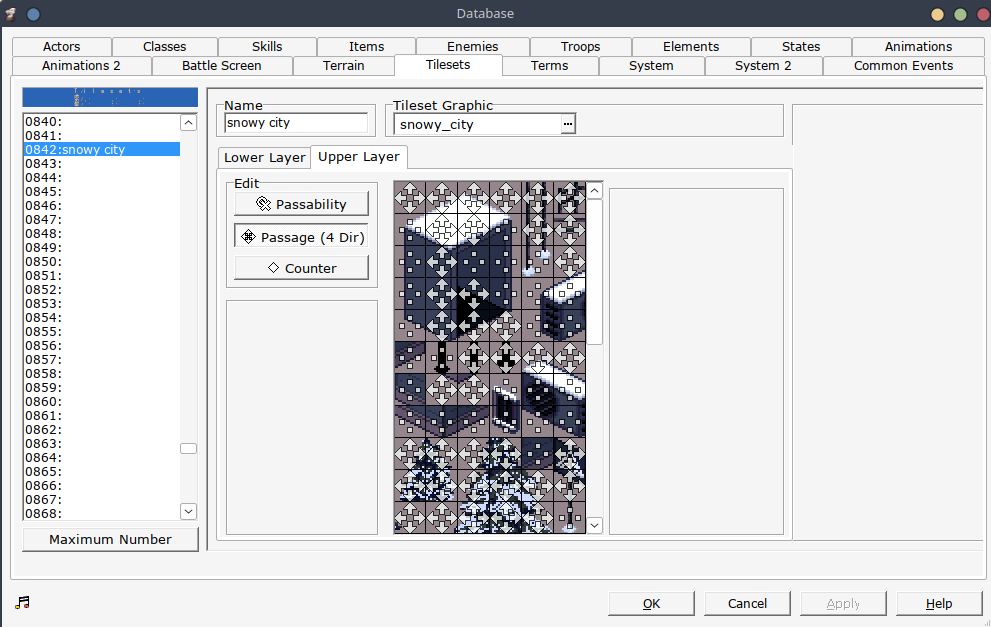
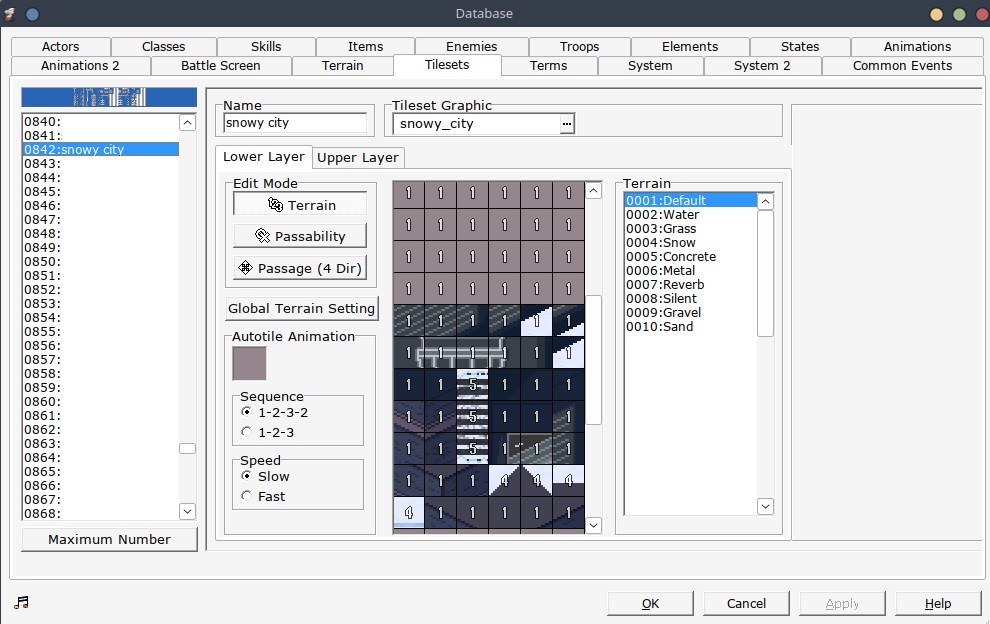
Setting the tileset up in Database
- In your RPG Maker project, in the top bar, go to Tools then choose Database.
- Go to the Tilesets tab. Select a free tileset ID from the left menu and name your tileset.
- Under the Tileset Graphic tag, click and select your imported tileset.
- Set the Terrain and the Passability for your tiles. Details on setting them up further down in the guide.
- Click Apply.
Now you can go to your map ID, right click on it to open map properites, and choose your tileset. You can start mapping now!
Terrain
Terrain, as the name suggests, is the type of terrain you set to your tiles. Different terrain can play different footstep sounds and even affect the player sprite, like how water terrain submerges the player. RPG Maker by default uses terrain for the battle system however, which is not used for Yume Nikki Fan Games, so you will need to set up the terrain first before putting it on your tileset.
Setting up Terrain for a new project
- In your RPG Maker project, in the top bar, go to Tools then choose Database.
- Go to the Terrain tab. Delete all the default preset terrain.
- Name the Terrain you want to add, for example, "Grass".
- Under the Footsteps tag, select the sfx you want to play as your footstep sounds for this terrain. You can import new sfx using Resource Manager and importing to the Sounds folder.
- If you want to the terrain to cover the player, for example, when making "Water" terrain, choose a setting from the "Charcter display" section in the bottom right.
- Click ok to save.
Setting up Terrain for your tileset
- In your RPG Maker project, in the top bar, go to Tools then choose Database.
- Go to the Tilesets tab. Select your desired tileset by clicking its ID.
- Make sure you have the terrain edit mode selected.
- Click the terrain type you want to assign to a tile from the right hand list, and then click the tile you want to assign the terrain to. You should see its terrain ID number now on the tile.
- Click Apply to save.
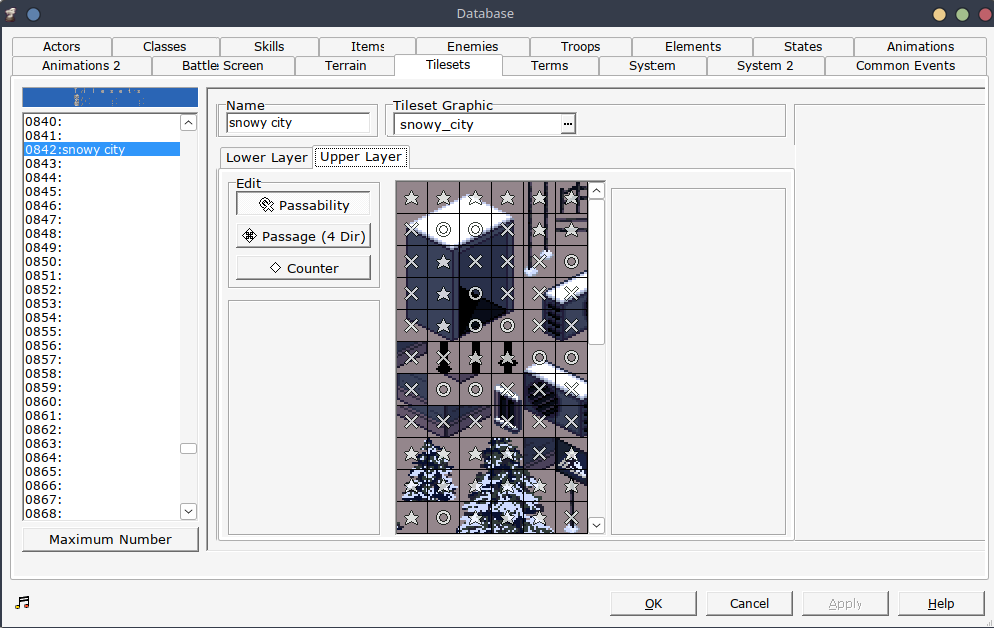
Passability
Passability is what determines collision in your map. There are 3 main types of passability in tilesets in RPG Maker 2000 and 2003.
- 〇 passability: Walkable tiles. Players can walk over these.
- X passability: Unwalkable tiles. These are tiles which can't be usually walked over.
- ★ passability: Overlay tiles. These tiles are on top of the player.
Note: If you put a walkable upper layer tile over an unwalkable lower layer tile, the upper layer tile passability gets the priority, and will make the tiles walkable.
Setting up passability for your tileset
- In your RPG Maker project, in the top bar, go to Tools then choose Database.
- Go to the Tilesets tab. Select your desired tileset by clicking its ID.
- Make sure you have the passability edit mode selected.
- Click on the tile you want to shuffle through the passability options.
- Click Apply to save.
Directional passability / Passage
You can make a tile passable and impassable in some specific directions using directional passability. This can also be used to make overlay ★ tiles that are impassable but above the player, which can prevent clipping issues with wider player sprites.
- In your RPG Maker project, in the top bar, go to Tools then choose Database.
- Go to the Tilesets tab. Select your desired tileset by clicking its ID.
- Make sure you have the passage edit mode selected.
- An arrow means that the tile can be walked over from the side it is facing at, and a square means that the tile cannot be passed from the side it is on.
- Click on arrow/box to toggle between them.
- Click Apply to save.